TL;DR: Solo creators often lose hours to inconsistent branding across platforms. An AI-powered design system cuts setup time from a weekend to an afternoon, but the real work is in defining the system’s rules before letting AI execute. This article gives you the pipeline to build one.
Environment
- Sources synthesized: 2 URLs (ParallelHQ AI agencies article, SoloBusinessHub creative design tools article)
- Synthesis date: 2026-04-10
- First-hand tested: Canva Pro, Midjourney, Figma, Notion, Zapier
- Operator context: Solo creator managing branding for a content business across Instagram, LinkedIn, newsletter, and blog; experience with template and AI-assisted design workflows for over 2 years
The Production Problem
Visual branding for a solo creator typically starts with excitement and ends with a folder of orphaned PNGs. You pick a logo from Fiverr, choose a color palette from Coolors, and maybe download a font from Google Fonts. Then you start posting.
Three months later, your Instagram feed looks one cohesive brand, your LinkedIn banners are a different font, and your newsletter header uses a variation of your logo you forgot you made. The bottleneck isn’t creativity — it’s the absence of a system to hold it all together.
According to UserGuiding’s 2025 report, 88 percent of consumers won’t return after a bad experience, and 94 percent of first impressions are design-related. That means every mismatched post is a potential lost customer. For a solo creator without design training, the problem escalates fast: each new content type requires manual design decisions, and over time the brand drifts.
The core problem is that most solo creators treat branding as a one-time asset creation task, not a living system. They create a logo and stop. A design system — even a lightweight one — requires rules, assets, and a process to keep everything aligned. AI can power that system, but it cannot define it. That’s where the production bottleneck sits.
The Pipeline
Building an AI-powered visual branding system for a solo operation takes about six hours upfront. Here is the breakdown:
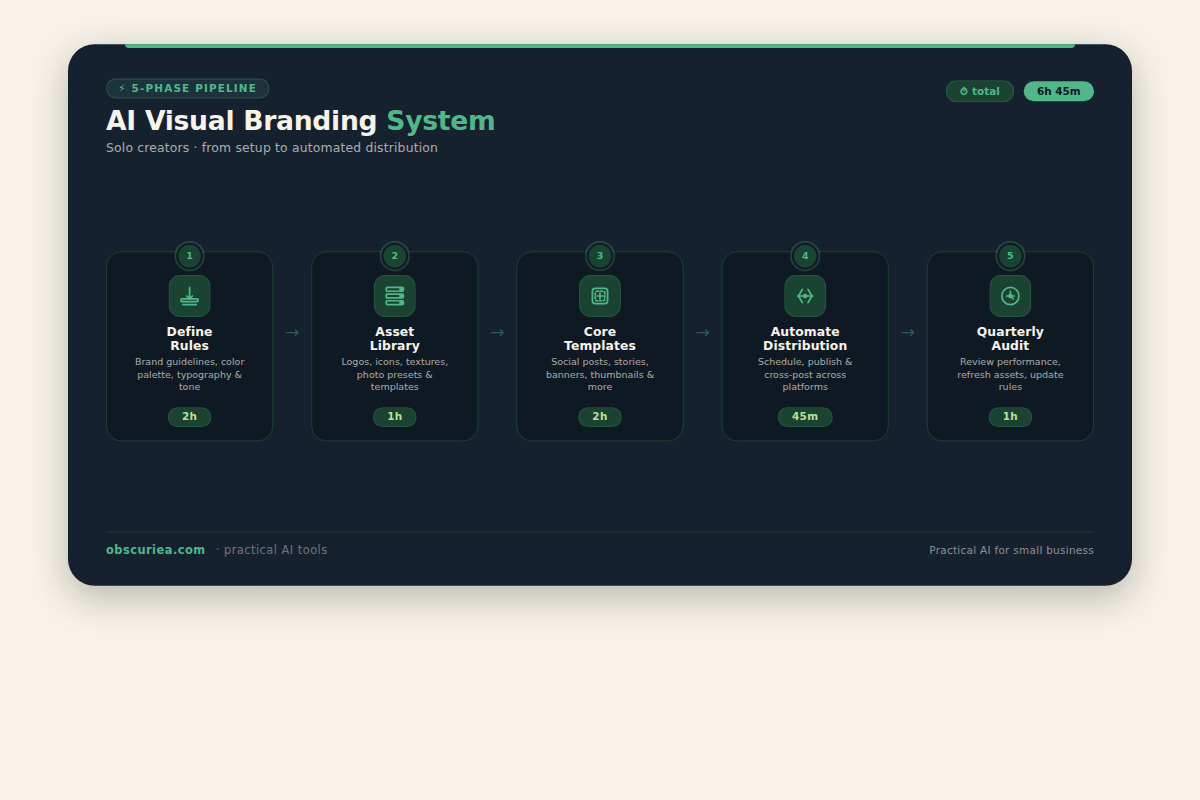
Phase 1: Define the Rules (2 hours)
This is the most important phase. Write down your brand’s visual DNA in a single document (Notion, Google Doc, or a dedicated design system tool like Zeroheight). Include:
- Colors: Primary hex, secondary, accent, neutral. Specify usage (e.g., primary for headers, accent for CTAs).
- Typography: Choose one headline font, one body font, one accent/sans-serif for buttons. Note sizes for desktop and mobile.
- Logo Variants: Full logo, icon-only, horizontal. Define minimum size and clear space.
- Imagery Style: Photography treatment (bright, desaturated, high contrast), illustration style (line art, flat, 3D), or AI-generated style (e.g., “cinematic lighting, shallow depth of field”).
- Layout Grid: Margin widths, column structure for web vs. social. Use a baseline grid if consistent.
- Tone of Voice: Not strictly visual, but copy appears on assets — specify adjectives (friendly, authoritative, minimal).
Don’t worry about getting it perfect; it will evolve. But you need a starting point. I use a Notion page called “Brand Bible” with a table for colors and a gallery for image examples. Reference images are crucial for AI tools later.
Phase 2: Build the Asset Library (1 hour)
With rules in hand, generate or gather your raw assets. Use AI image generators like Midjourney or DALL·E 3 to create a batch of background images, illustrations, and product mockups that match your style. Use the “image as prompt” feature to maintain consistency — upload a reference image that embodies your brand’s visual feel.
If you’re using stock photography, create a collection of presets (Lightroom or Canva filters) that you apply consistently.
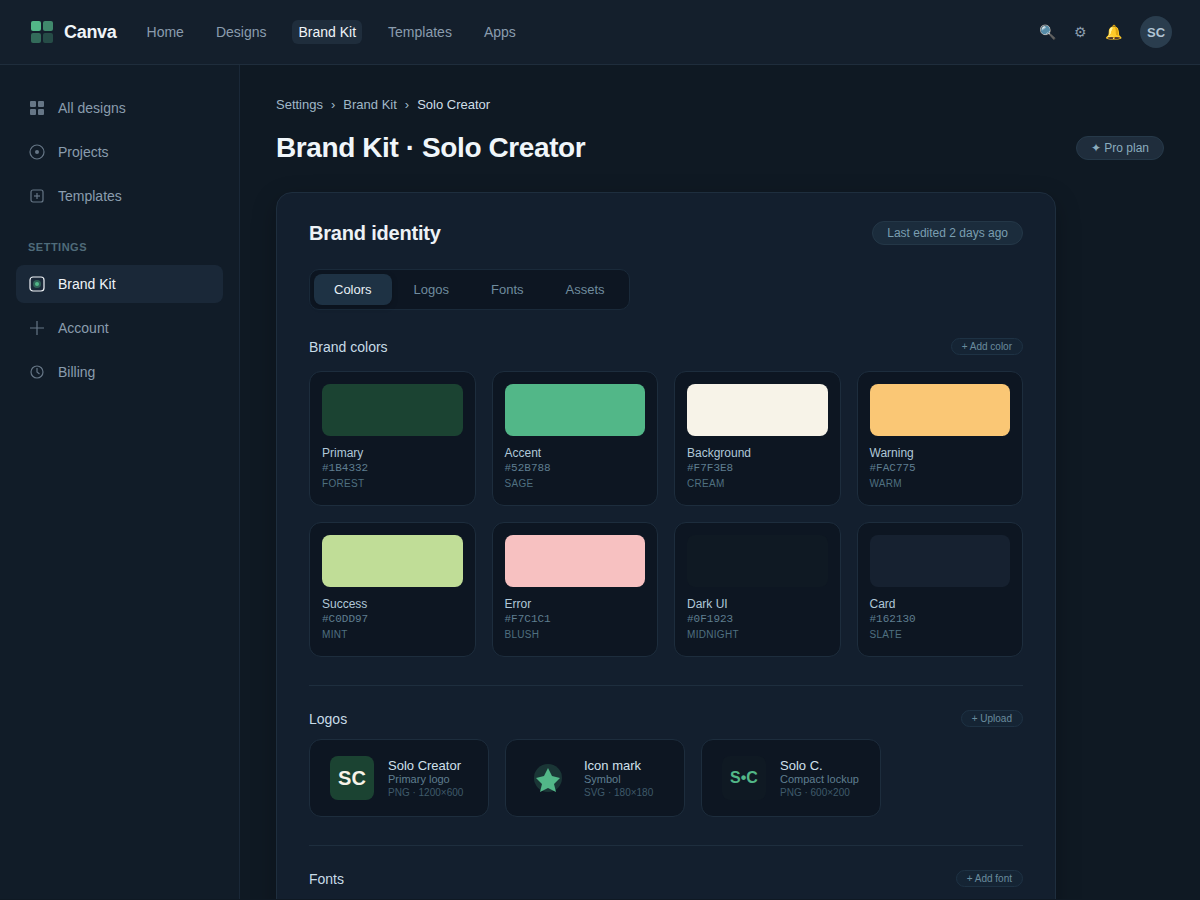
Upload all assets into your Brand Kit. For Canva Pro users, the Brand Kit feature can store colors, fonts, and logos, and you can add the generated images as templates. For Figma users, create a shared library with color styles, text styles, and components.
This is also where you set up your logo package: export the logo in all required formats (PNG, SVG, JPG) and sizes (social, web, print). Store in a cloud folder.
Phase 3: Create Core Templates (2 hours)
Design 5–7 templates that cover your most common content types:
- Social post (square 1:1)
- Story background (9:16 vertical)
- LinkedIn banner (1584×396)
- Blog header (1200×630)
- Newsletter header
- Quote card
- Product/Services carousel
Use your asset library and brand rules. In Canva, create these as templates and lock the brand elements. In Figma, use components and auto-layout so you can swap images and text without breaking the layout.
Important: Templates must be flexible. For example, a social post template should have a text box that can accommodate both short quotes and longer copy. Test with actual content.
AI can help generate variations: tools like Recraft.AI allow you to upload a brand style and generate multiple layouts. But always audit each output manually — AI can misinterpret brand colors (especially shades) and create inconsistent proportions.
Phase 4: Automate Distribution (45 minutes)
The goal is to eliminate manual asset creation for every post. Set up a workflow:
- When you publish a blog post (WordPress/Webflow), trigger Zapier to push the headline, summary, and image to Canva.
- Canva automatically creates a social post using your blog header template and saves it to a folder.
- Zapier then sends the completed image to Buffer or Hootsuite for scheduling.
This reduces the per-post design time to zero. The only human step is to review the auto-generated image and adjust if needed.
For video content, tools like Descript can auto-generate thumbnails using brand templates.
Phase 5: Quarterly Audit (1 hour every 3 months)
Design systems grow stale. Every quarter, spend one hour reviewing:
- Which templates are getting the most engagement? Update those.
- Which brand rules feel restrictive? (Maybe your accent color is not representing your brand anymore.)
- Are there new content types to add? (Reels covers, podcast episode art.)
- Update your AI style reference with recent top-performing assets.
Use analytics from social platforms and email campaigns to inform changes. AI can summarize trends, but you decide which ones to follow.
The Human Layer
The entire pipeline above assumes that a human is in control. AI generates images faster than any human, but it lacks taste, context, and brand memory. Here’s what only a human should do:
- Edit AI outputs: Remove the third generation that has a weird hand. Adjust saturation to match the original brand feel.
- Check brand alignment: Does this font combination feel too playful for the topic? AI cannot judge tone.
- Maintain consistency across mediums: A design system in Canva may not transfer perfectly to Figma; the human enforces the spirit of the rules.
- Make strategic decisions: When to refresh the brand, when to break the system for a specific campaign, when to ignore AI’s suggestions.
Schedule 15–30 minutes per week to review new content and ensure everything stays on brand. AI handles the grunt work; you handle the judgment.
The Friction Box
Real problems encountered:
- AI image generators (Midjourney, DALL·E) produce inconsistent faces and brand elements across sessions. Use seed numbers and style references, but expect variance.
- Canva Brand Kit limitations on free tier: only 3 brand kits, limited uploads. Upgrade to Pro ($12.99/month) for full functionality.
- The upfront 6-hour investment is a barrier for creators who already feel time-poor. Many skip Phase 1 and end up with a messy system that requires more maintenance.
- Platform-specific constraints: Instagram square, LinkedIn banners, Twitter header — each requires a separate template dimension. Keep a template for each format.
- AI tools can “hallucinate” brand elements: adding extra text, altering logos, changing proportions. Manual review is mandatory, not optional.
- Subscription costs accumulate: Canva Pro, Midjourney, Zapier, Figma — budget $50–100/month for a basic stack.
- Version history is often absent in free tiers. If an AI tool overwrites a template, you lose the original. Keep backups of your core templates.
Frequently Asked Questions About AI-Powered Visual Branding and Design Systems for Solo Creators
What are the best AI tools for visual branding?
For image generation, Midjourney and DALL·E 3 lead in quality. For design system management, Canva Pro offers the easiest entry for non-designers, while Figma provides more control for those who want component-based systems. For automated branding, tools like Frontify and Zeroheight help document rules. The key is to choose tools that integrate with your existing workflow rather than adopting everything.
How do I maintain consistency if I use multiple AI tools?
Consistency comes from having a single source of truth — your brand style guide document. Always upload the same brand reference image and use the same style prompts across tools. For color accuracy, input exact hex codes into each tool’s color picker instead of relying on visual selection.
Can I build a design system if I’m not a designer?
Yes. Start with a very simple system: two colors, two fonts, one image style. Use templates from Canva or Figma that you customize to your brand. The goal is not perfection but consistency. As you get comfortable, you can add more rules. Many solo creators succeed with just a well-organized Canva account and a style guide in Notion.
How often should I update my brand guidelines?
Review them quarterly. Use engagement data to decide what to change. If a particular color or image style consistently underperforms, replace it. Brands naturally evolve with audience feedback. Also update when you expand to a new content type — a new social platform may require adjustments.
Is it worth paying for Canva Pro vs free for my solo brand?
If you have more than one brand or need more than 3 brand kits, the free tier becomes frustrating. Canva Pro ($12.99/month) also gives you background removal, brand templates, and priority support — all useful for a solo creator managing multiple content types. For a single brand with basic needs, free can work if you’re disciplined.
How do I ensure my AI-generated images are unique?
Combine AI generations with your own edits: crop, overlay text, change colors, add your logo. Use unique style prompts that specify brand elements. Save seeds from Midjourney to recreate similar looks. Also mix AI output with original photography or illustrations to make your brand unmistakable.
The Straight Talk
This system is for solo creators who publish to two or more platforms consistently and care about brand perception. If you post a photo to Instagram once a week and your brand is “whatever looks good today,” this is overkill. But if you’re building an audience, attracting sponsors, or selling products, your visual consistency directly impacts trust and conversion.
Invest the six hours now. Start with Phase 1: define your brand rules in one document before touching any AI tool. That document is your foundation — everything else builds on it.
Internal links: For more on automating your content production, read AI content creation workflows. To see how this fits into a broader solopreneur toolkit, check building your solopreneur tech stack.