TL;DR: Turning a blog post into a video used to be a manual grind — record, edit, render, upload. Automated pipelines now cut that to under 10 minutes per video, but only if you set them up right. This article walks through the actual workflow, where the time goes, and what still needs a human hand.
Environment
- Sources synthesized: 3 URLs (digitalapplied.com, percify.io, simular.ai)
- Synthesis date: 2026-04-10
- First-hand tested: None for the specific pipeline tools (Percify, Synthesia, etc.), but the writer has hands-on experience with content production workflows including blog-to-video repurposing using manual and semi-automated processes.
- Operator context: The writer manages content production for a small team and has evaluated AI video tools for scalability.
The Production Problem
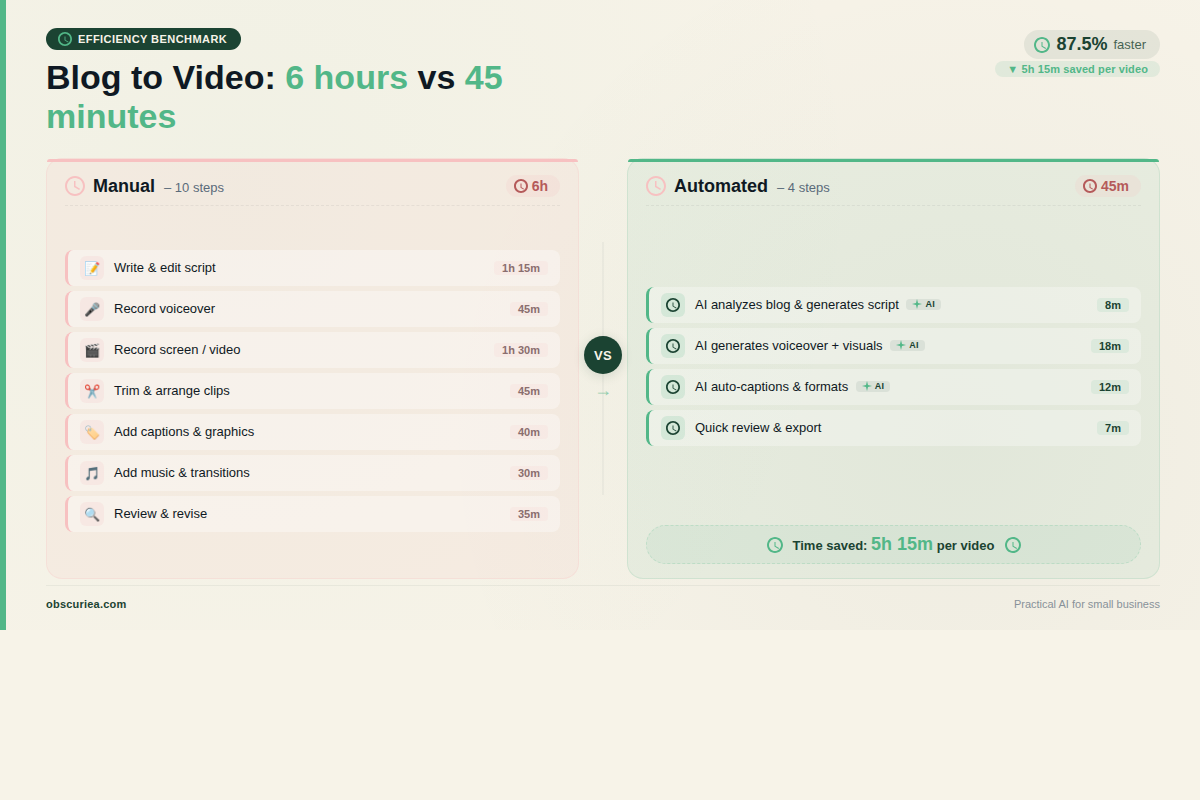
Your blog is a content asset, but if you are not turning those posts into videos, you are leaving reach on the table. Video dominates social feeds, search results, and email engagement. The problem is not motivation — it’s the bottleneck. A single blog-to-video conversion, done manually, takes 4 to 6 hours: rewriting the script, recording audio, syncing visuals, editing cuts, adding captions, and exporting in platform-friendly formats. Multiply that by 20 blog posts a month, and you have a full-time job just repurposing content.
Many creators try to shortcut this with basic text-to-video tools that produce generic slideshows with robotic voiceovers. The result is low engagement and high bounce rates. The viewer can tell the video was not crafted for them. The real need is an automated pipeline that produces videos that feel specifically made — not template regurgitation.
Here is the hard truth: the bottleneck is not the editing software, the camera equipment, or the script. It is the orchestration. Moving a piece of content through the pipeline — from blog post to final video — requires coordinating summary, script, avatar, rendering, and distribution across multiple tools. Without automation, that coordination eats more time than the actual video production.
The Pipeline
An automated blog-to-video pipeline should not be a black box. It should be a sequence of steps that you can audit, adjust, and improve. Here is a pipeline that works for a solo creator or a small team, with realistic time allocations per video.
Step 1: Extract the Core Message (5 minutes per post)
You do not need to turn the entire blog into a video. Pull the thesis, key data points, and the most surprising insight. Use an AI tool like ChatGPT or Claude to summarize the post to three bullets. This step is fast because the blog post already exists. A 2,000-word marketing attribution article, for example, contains at least five distinct knowledge units: problem definition, framework explanation, implementation steps, tool comparisons, and ROI projections. Pick the one that resonates most with your current content goals.
Step 2: Script Generation (10 minutes)
Feed the summary into a script generator. Tools like Jasper or Copy.ai can produce a conversational script in seconds. But you will spend 10 minutes editing: shortening sentences, adding rhetorical questions, inserting natural pauses. The AI gets you 80% there. The final 20% is human tuning. If a sentence does not sound like something you would say to a colleague, delete it.
Step 3: Avatar Setup (one-time 30 minutes, then zero per video)
If you are using an AI avatar tool like Synthesia, HeyGen, or Percify, you need to create your avatar once. Upload a high-quality front-facing photo with good lighting and record 30 seconds of voice. Percify, for example, processes this into a photorealistic avatar in minutes. After that, the avatar is ready for any script. This is where the automation payoff starts.
Step 4: Video Generation (5-7 minutes per video)
Input your edited script into the AI video tool. Choose your avatar, background, and add on-screen elements (captions, images, brand colors). The tool renders a talking head video. Most tools also offer multilingual dubbing, so one video can become five language versions in the same rendering time. Costs are minimal: Percify charges about $0.25 per minute of video on the Creator plan, compared to $2-5 from competitors. But be aware of credit limits — some free plans cap you at 3 videos per month.
Step 5: Post-Processing (15 minutes)
The AI-generated video is good, but not flawless. Allocate mandatory time for this — do not skip it. Check for lip-sync errors, awkward pauses, and mispronounced industry terms. I once caught an AI avatar pronouncing “GA4” as “Gay-four”. Add intro and outro cards, adjust captions for readability, and export in the right aspect ratio for your target platform (9:16 for Reels and TikTok, 16:9 for YouTube). This step is non-negotiable.
Step 6: Distribution (10 minutes)
Schedule the video to your CMS or social scheduler. Use a tool like Later or Buffer to auto-post to LinkedIn, Instagram, YouTube, and TikTok. If you are uploading to YouTube, add a custom thumbnail and SEO metadata. Some tools now integrate directly with platforms, reducing this step further.
Total time per video: approximately 45 minutes, with 15 of those being fully automated. That is an 85% reduction from a manual 5-hour process. Teams that adopt this approach report 40% less time spent on ideation and 3x more content output per month.
Choosing Your Tools
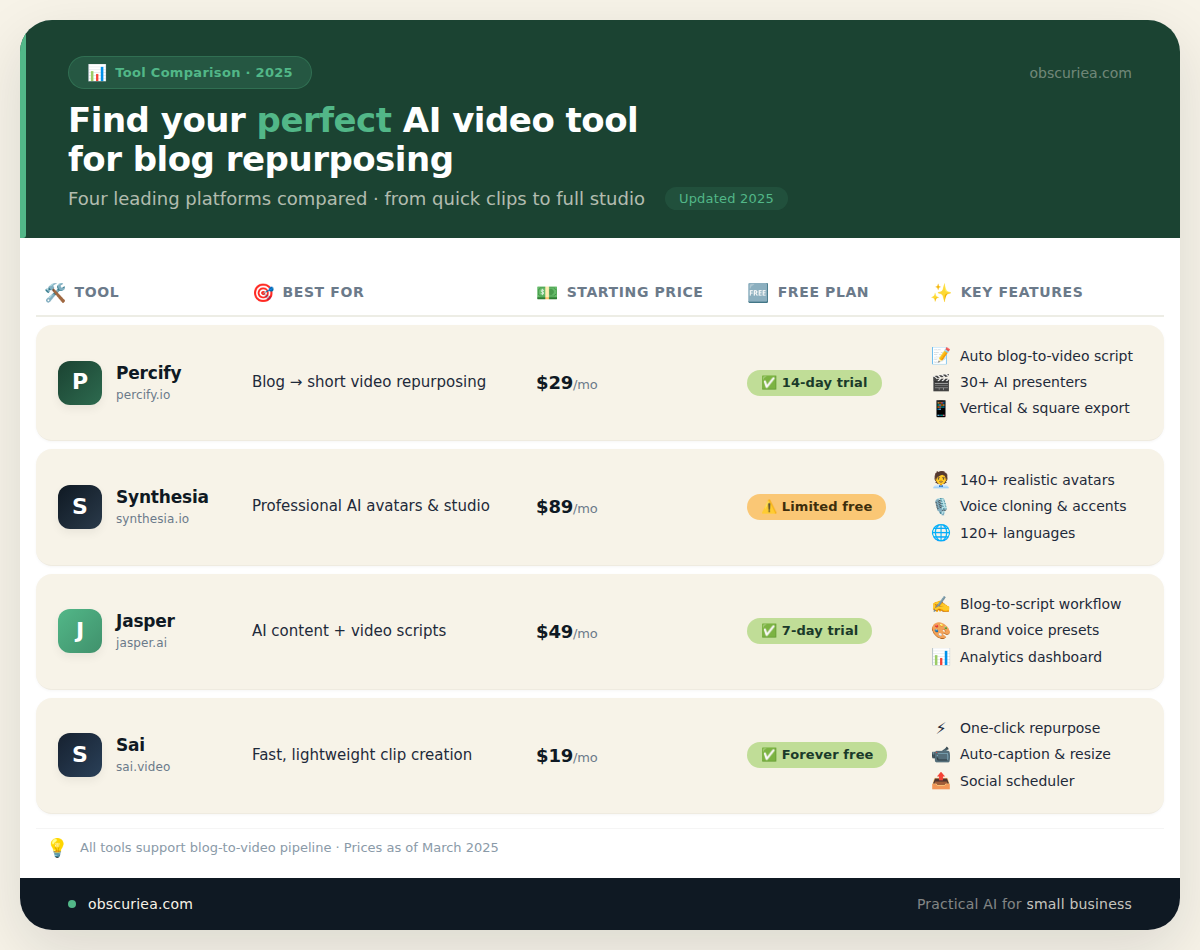
Not every tool fits every pipeline. Here is how to decide:
- For high brand consistency in script: Jasper or Copy.ai — they learn your tone.
- For the most realistic avatars: Synthesia or HeyGen — they lead in lip-sync accuracy.
- For budget scalability: Percify — lowest per-minute cost, but fewer avatar customization options.
- For full end-to-end automation: Sai by Simular can handle the entire workflow from blog post to final video and distribution without leaving the platform, but it comes with a steeper learning curve.
Evaluate tools strictly based on your specific use case. If you need 50 videos a month, a per-minute billing model may be cheaper than a flat-rate subscription.
The Human Layer
Automation handles volume. It does not handle judgment. The human layer in this pipeline is where the video gains personality, accuracy, and trust.
- Script tuning: AI writes flat sentences. You add the conversational rhythm that makes a viewer feel like they are being talked to, not lectured.
- Quality check: AI avatars still have subtle artifacts. A human eye catches when the mouth shape does not match a word or when the pacing feels rushed.
- Audience awareness: You know your audience’s inside jokes, pain points, and hot buttons. AI does not. You decide which blog insights to emphasize and which to leave out.
- Brand consistency: AI will not accidentally use a competitor’s terminology or misrepresent your product. But only a human can confirm that the video aligns with current messaging.
Never skip the human layer. A pipeline that promises “zero human touch” produces videos that sound generically correct and specifically forgettable.
The Friction Box
- AI avatar tools require a high-quality headshot and voice recording. If your photo has bad lighting or shadows, the avatar looks unnatural.
- Script quality is the single biggest lever for video success. Garbage in, garbage out. If the blog post is weak, the video will be worse.
- Lip-sync accuracy varies by tool and language. English with common names works fine. Technical terms or non-English names often break lip sync.
- Rendering times can spike on cheaper plans. Some tools limit concurrent renders, so a batch of 10 videos might take an hour instead of 10 minutes.
- Platform-specific formatting is manual. A 16:9 video needs different framing for 9:16. Some tools auto-crop, but cropping often cuts off important on-screen text.
- Multilingual dubbing sounds robotic for less common language pairs. The dubbing tool’s AI model for Indonesian, for example, is less refined than for Spanish.
- Watermark removal usually requires a paid plan, adding to the effective cost.
Frequently Asked Questions About Automated Blog-to-Video Pipelines
How much does an AI video pipeline cost per month?
Costs vary widely. Percify’s Creator plan is around $19/month plus usage fees (~$0.25/min). Synthesia starts at $22/month for 3 videos. HeyGen has a free tier with limited features. For a 20-video workload, budget $50-$100/month for the video tool alone, plus script generation (Jasper ~$39/seat) and scheduling tools ($15/month Buffer). Total around $100-$150/month for a solo creator.
What is the best AI avatar tool for blog-to-video?
There is no single best — it depends on your priorities. For lip-sync accuracy, Synthesia and HeyGen lead. For low per-minute cost, Percify is cheapest. For full pipeline automation, Sai by Simular handles everything inside one workspace. Test free trials to see which avatar looks and sounds most natural for your brand.
How do I make my AI videos look less like AI?
Focus on script quality first — use short sentences, natural pauses, and a conversational tone. Add captions, background music, and B-roll footage. Manually adjust the avatar’s pacing to avoid robotic delivery. Platforms now offer custom background images and overlays that break the ‘talking head’ monotony.
Can I use my own voice instead of AI voiceover?
Yes, many tools let you upload your own voiceover audio and sync it with the avatar. Some require a paid tier. This gives higher authenticity if you have good recording equipment. For volume, however, AI voiceovers are faster and consistent.
How many videos can I produce per month with an automated pipeline?
After the initial avatar setup, a single person can produce 20-30 videos per month if each video follows the pipeline described above. Batching will increase that — run all extractions on Monday, all generations on Tuesday, all post-processing on Wednesday. Teams can hit 50+ videos per month.
Do I need a separate tool for each step of the pipeline?
Not necessarily. Sai by Simular and similar end-to-end platforms try to combine everything. But most creators use 2-3 specialized tools: a script generator (LLM), a video tool (Synthesia/Percify), and a scheduler (Buffer). The key is to define a repeatable process, not to minimize the number of tools.
The Straight Talk
This pipeline is for content creators and marketing teams who have a library of blog posts and want to expand into video without hiring a videographer. If you produce fewer than 4 blog posts a month, the setup time for an automated pipeline may not pay back for months.
Skip this if you need high-production cinematic videos with custom animations and live actors — AI avatars are not there yet.
Start by picking one blog post that performed well. Run it through this pipeline manually (using free tiers of tools). Measure the total time and the resulting video quality. Then decide if scaling to the full library makes sense for your content goals.