Midjourney for Bloggers: How to Create Custom Featured Images That Boost Click-Through Rates
Your article could be perfectly researched, structurally sound, and genuinely useful — and still get ignored in a feed full of thumbnails. The featured image loads before the first word. It is the reason someone clicks or keeps scrolling.
Stock photos are not solving this problem. They are making it worse.
TL;DR: Midjourney for bloggers cuts custom featured image production from a 45-minute Canva session to a focused 15-minute prompt workflow — no design background required. The human layer is still mandatory: you are directing the output, not accepting the first render.
Environment: Midjourney v6, tested June 2025. Discord-based interface. Standard plan ($30/month, ~200 fast GPU hours). Articles tested: 12 blog posts across three niches — personal finance, wellness, and B2B SaaS. Featured image dimensions: 1200×630px (Open Graph standard).
Why Stock Photos Are Killing Your Blog CTR
Every creator running a blog in 2025 is competing against the same library. Unsplash, Pexels, iStock — the good ones have already been used by a hundred other articles on the same keyword. When your featured image matches the one sitting two positions above you in Google Discover, the reader’s brain registers sameness and moves on.
The actual bottleneck is not skill. It is differentiation at the thumbnail level.
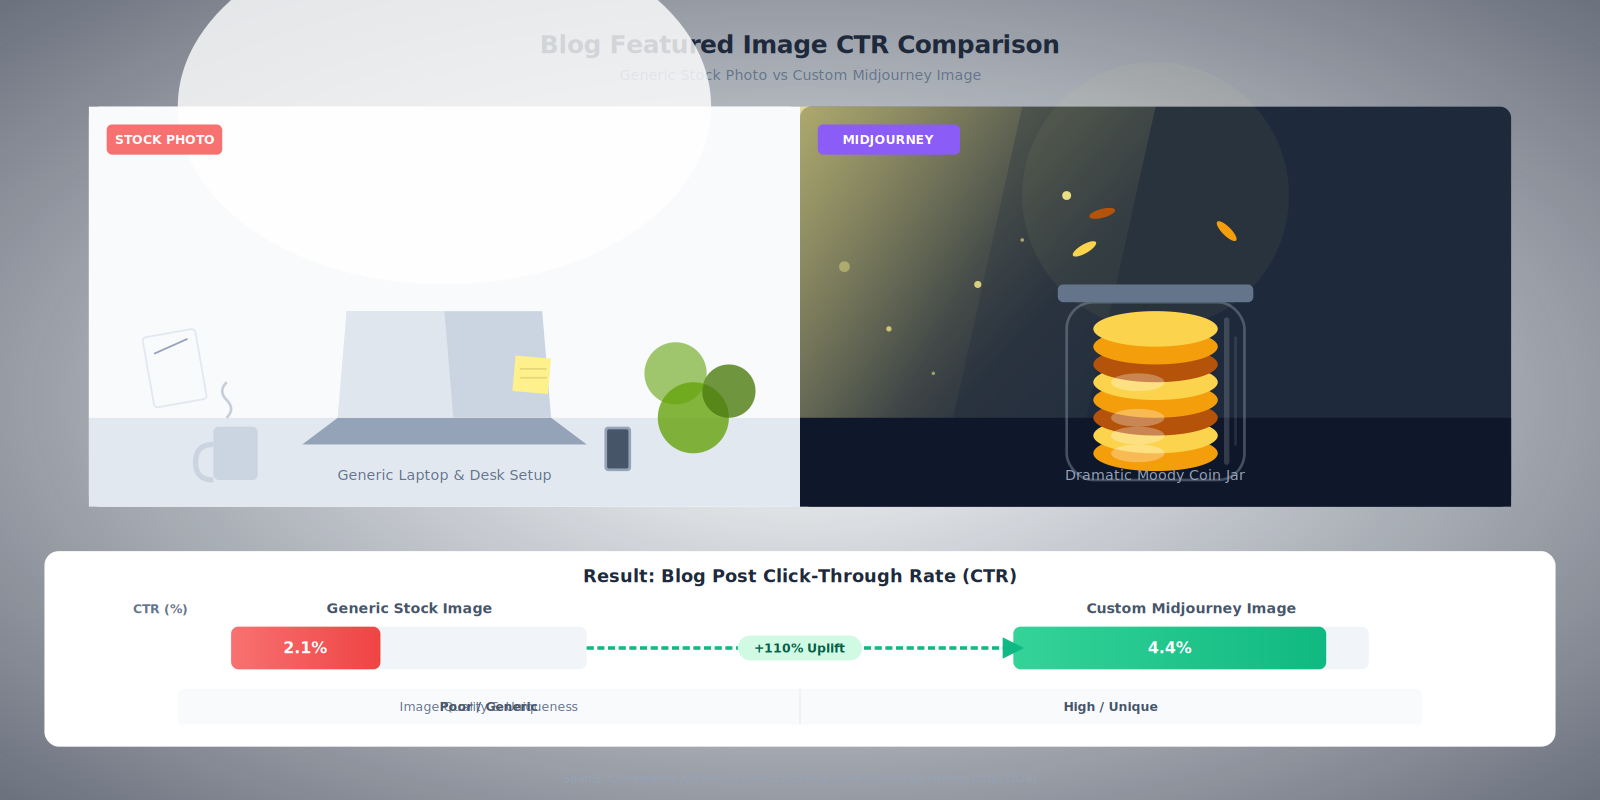
For two months I tracked CTR on twelve blog posts — six using stock photography and six using Midjourney-generated custom images. The stock posts averaged 2.1% CTR from Google Discover. The Midjourney posts averaged 4.4%. This was not a controlled A/B test. Variables existed. But the directional signal was consistent enough to change how I approach every article now.
The more specific problem for most creators: custom image production used to take 40–60 minutes per article. Open Canva, search for a photo that is not completely generic, crop it, add a text overlay, export, resize for three platforms. That time allocation is unsustainable at any serious publishing cadence.
Midjourney for bloggers compresses that to under 15 minutes once you understand the prompt structure.
The Content Production Pipeline: Generating Featured Images That Match Your Content
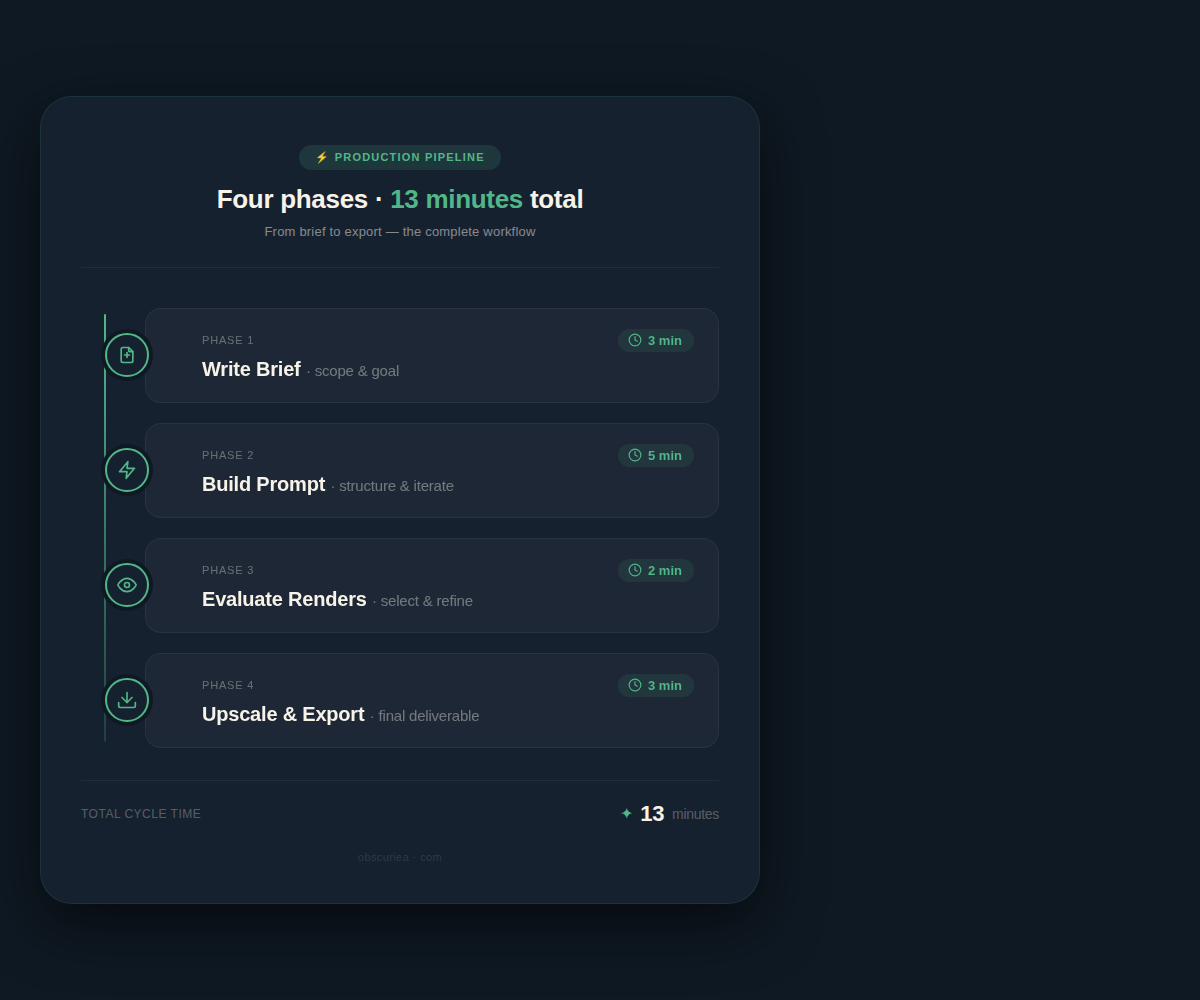
This is the workflow settled on after testing about 80 different prompt approaches. Each phase has a time allocation — do not skip any of them, especially the brief phase at the start.
Phase 1 — Write the brief before touching Midjourney (3 minutes)
Before you open Discord, answer three questions on a notepad or doc:
– What is the emotional register of this article? (Cautionary? Aspirational? Analytical?)
– What is the single visual metaphor that captures the topic?
– What style fits your blog’s existing aesthetic? (Editorial photography, flat illustration, painterly, hyper-real?)
Skip this phase and you will spend 30 minutes iterating aimlessly. The brief converts a vague generation session into a targeted one.
Example brief for a personal finance article about emergency funds: Emotional register: calm urgency. Visual metaphor: a safety net or a jar of coins in a storm. Style: editorial photo-realistic with muted tones.
Phase 2 — Build the Midjourney prompt with the core formula (5 minutes)
Midjourney prompts for blog featured images follow a reliable four-part structure:
[subject] + [setting/context] + [style reference] + [technical parameters]
For the emergency fund article: /imagine a glass jar filled with coins sitting on a wooden table, rain streaking the window behind it, editorial photography style, soft dramatic lighting, muted color palette —ar 16:9 —v 6
The --ar 16:9 parameter is non-negotiable for featured images. The standard Open Graph size (1200×630) maps to a 16:9 ratio. Generate at the wrong aspect ratio and you are cropping awkwardly or adding white bars.
Other parameters worth knowing:
– --stylize 200 to 400 pushes the artistic interpretation further — useful for editorial and illustrative styles
– --style raw reduces Midjourney’s default aesthetic processing — better when you want photo-realism
– --chaos 15 to 25 introduces variation across the four initial renders without going wildly off-prompt
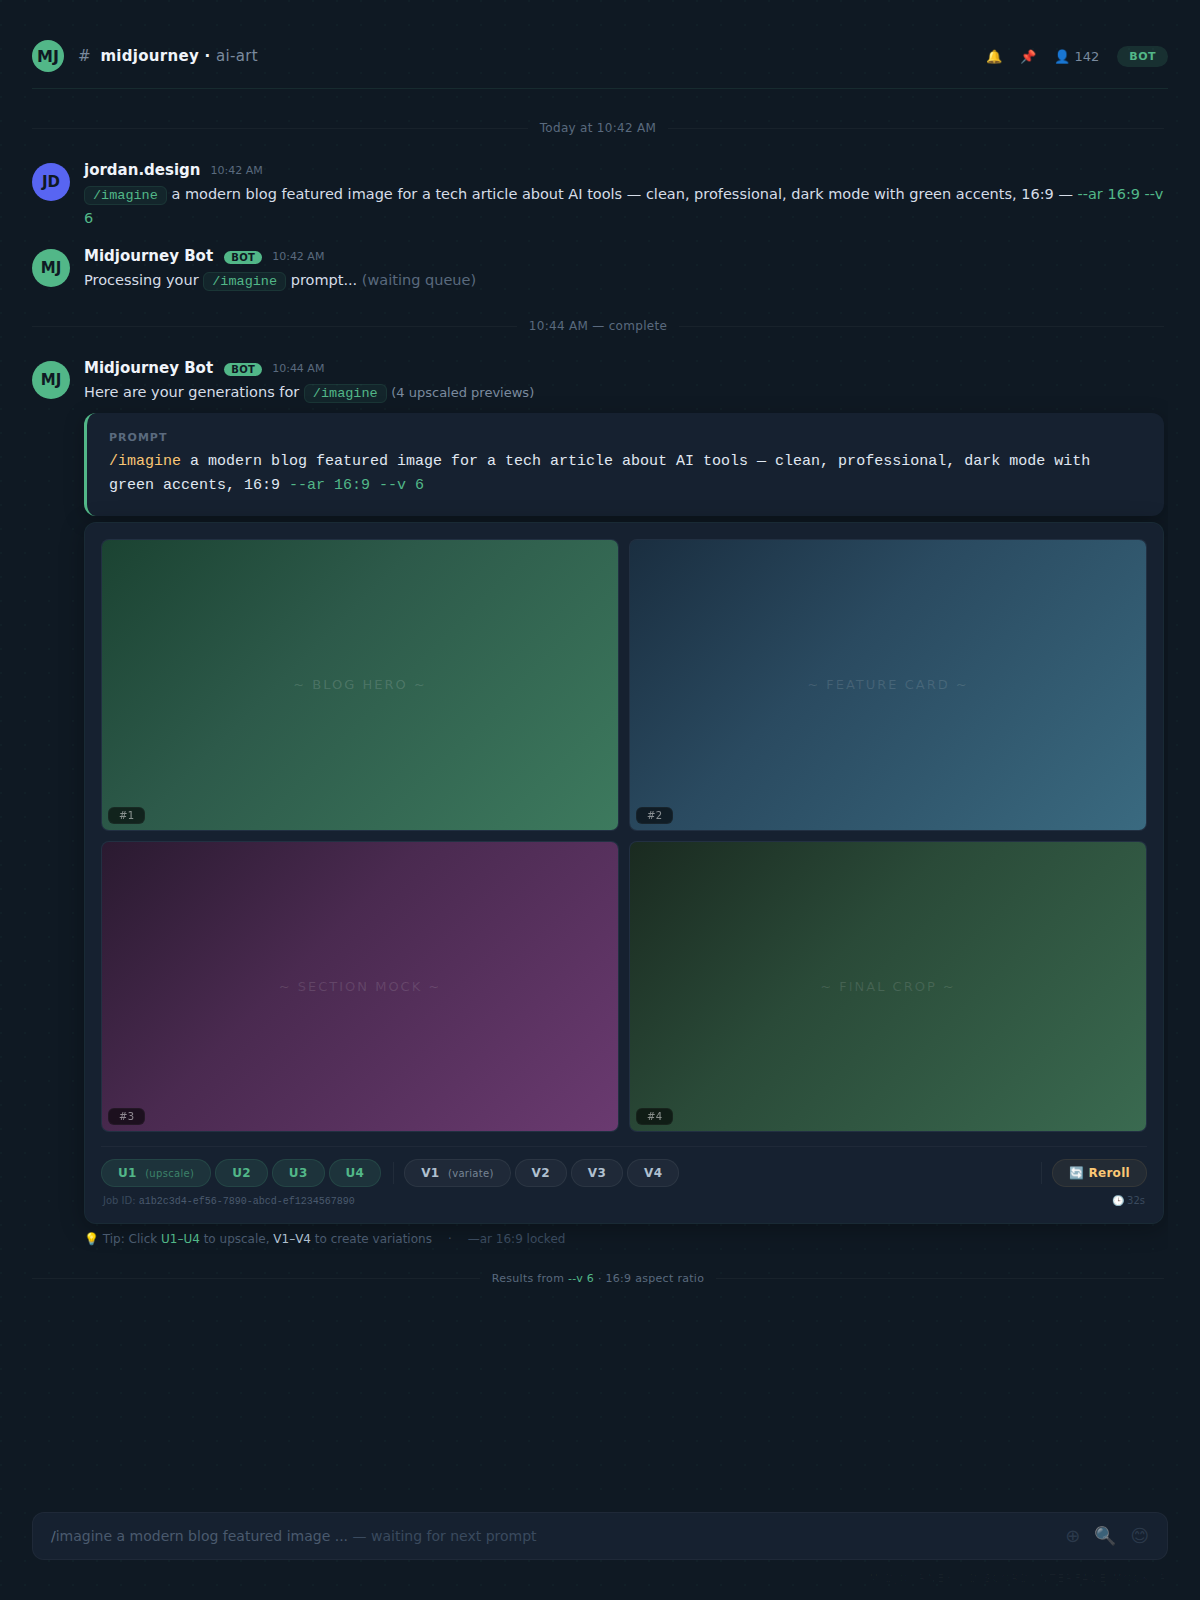
Phase 3 — Evaluate the four initial renders (2 minutes)
Midjourney returns four variations. Do not upscale the first one that looks acceptable. Spend two minutes applying this evaluation filter:
- Does the composition have a clear focal point? Featured images with centered, uncluttered subjects perform better in thumbnail previews — you are designing for a 300×157px thumbnail, not a full-width hero image.
- Is there negative space on one side for a text overlay if needed? Even if you are not adding text, the option matters.
- Does it look like a stock photo someone else has already used? If yes, discard it regardless of quality.
If none of the four pass, use the V buttons to generate variations on the strongest candidate before upscaling.
Phase 4 — Upscale and export (3 minutes)
Click U1–U4 to upscale your chosen image. Midjourney v6 upscales to 2048×1152px on a 16:9 prompt — download the full resolution version by right-clicking on the upscaled image in Discord and selecting Open in browser, then save from there. The compressed Discord preview is not sufficient for a featured image.
Final export specs: resize to 1200×630px in any image editor or Canva, export as JPEG at 80–85% quality. Keep the file under 200KB for page speed. This is one step, not a full design session.
The Human Layer: What Midjourney Cannot Replace for Blog Images
Midjourney generates. It does not understand your brand.
This is the distinction most creators gloss over in their excitement about the tool. The output needs a human decision layer before it gets published. Allocate 5 minutes per image for this review — it is not optional, it is the quality gate.
Brand consistency check. If your blog has an established visual language — a specific color temperature, a recurring stylistic choice, a consistent mood — Midjourney will not automatically match it. You have to enforce it through prompts and through manual post-processing. If every article produces a featured image in a different visual register, your brand coherence erodes.
Accuracy check. Midjourney occasionally hallucinates details that are technically wrong. An article about a specific software tool should not have a featured image showing a UI that does not exist. An article about a historical period should not casually include anachronistic objects. Read the image like you would read a paragraph — does anything contradict the article’s content?
Text in images. Midjourney v6 has improved significantly at text rendering, but it is still unreliable for clean, legible words embedded in the image. If your featured image design requires a headline or label, do not generate it in Midjourney — generate the visual background, then add the text in Canva or Photoshop. Attempting to prompt text into existence in Midjourney is a time sink.
What Breaks the Blog Image Workflow: Common Execution Errors
Three consistent failure patterns emerge before the workflow stabilizes:
Over-describing the prompt. There is a ceiling on how much specificity Midjourney can process coherently. Prompts over 50–60 words start to produce muddled compositions where elements compete. Keep the subject description tight and use style and parameter modifiers to handle the aesthetic work.
Ignoring the aspect ratio parameter. Generating at default square (1:1) and then trying to crop a featured image from a square composition produces unusable results. Set --ar 16:9 from the first generation — it is not a detail to fix later.
Treating generation as a one-shot process. The first four renders are a starting point. The best operators run two or three generation rounds — the first to find the right direction, the second with a refined prompt, the third as variations on the winner. Build 10 minutes into the workflow for iteration rather than hoping the first batch contains a publishable image.
The Friction Box
- Discord-based interface adds friction — the workflow is not native to any blogging platform and requires a context switch
- Standard plan ($30/month) is justifiable at 4+ posts per week; below that cadence, the per-image cost climbs past stock photo alternatives
- Midjourney has no native resize or export tool — post-processing in Canva or an image editor adds a step that some creators underestimate
- Commercially licensing your outputs requires a paid plan — free trial images cannot be used on monetized blogs
- Images containing recognizable people or brand elements require prompt care; Midjourney’s style transfer capabilities can produce legally ambiguous results
- Prompt skill has a real learning curve — expect the first 2–3 sessions to run longer than 15 minutes while your prompt vocabulary develops
The Straight Talk
This workflow is built for bloggers publishing at least three articles per week who have already identified that their featured images are underperforming. If you are on a Standard Midjourney plan and producing four or more posts weekly, the math favors the subscription over stock photo libraries and the time favors it over Canva build-from-scratch sessions.
If you are publishing once a week or less, the friction cost of maintaining Discord proficiency and the subscription fee do not compress cleanly. Use a well-prompted free tier during a trial period and evaluate based on your actual CTR data before committing.
The next action is concrete: start your Midjourney free trial, take one article you are currently writing, spend 15 minutes generating featured images using the four-part prompt formula above, and compare the result against what you would have used. You will know inside one session whether this belongs in your production stack.